Saturday, 31 December 2016

Serious disassembly has now started

Yesterday I continued on with the work I discovered I need to do on the Land Rover the other day. Namely to remove the front axle so I can get easily to all sides of the hub assemblies and the diff because they seem to have managed to fill with water and grit.
This jack has been doing quite a bit of work since I bought this land rover. It is just the one that came with my ute for replacing the occasional flat. Whereas for a while now it has been lifting up the land rover almost regularly to pretty close to the limits of the jack.
Hmmm. There seems to be a problem here. Unfortunately the wheels had to come off to be able to fit under the bullbar.
That will fit a bit better.
Now I found another problem. This whole assembly is way yonder too heavy for me to pick up and put the wheels back on. So I just dragged it until it would be in a spot where I can pull it apart without it getting in the way.
This process has made me want to remove everything and do a complete restoration rather than just a quick get back on the road. This rod (Not sure what it's called. Ties the hubs together so they turn at the same time.) has ball joints at each end. This is what they look like:
There is no more rubber boots at either end and both of them are stiff and don't really move very well at all. These will both need to be replaced and I will need to check the other ball joints as well. Also when I detached the prop shaft from the diff I discovered that the bolts were surprisingly loose.
These are issues that would get fixed with normal maintenance on any car but from the previous use I was told about. There would have been between practically none and actually none.

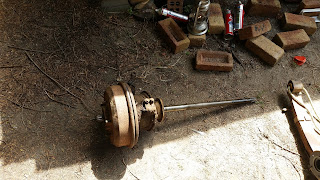
One grotty hub with the axle still in. I figured that I would clean everything up a bit so it's a little nicer while I'm pulling this all apart.
It's a bit hard to tell in the pictures, but just a few minutes with the pressure washer and the bulk of the grot and oil have been washed off. As it was starting to get pretty warm and I had been hit with a fair bit of spray from cleaning this up and needed a shower. I decided to call it a day. So a heavy coat of WD-40 and this is ready for me to finish pulling apart and cleaning properly.

I'm tossing up while I have everything apart getting some proper chassis paint and cleaning everything with a wire wheel and painting it properly.

Cheers,
Rex

Thursday, 29 December 2016

I've been working on the railroad

In a stark contrast to yesterday when I spent the day inside in the air conditioning, I decided to go down to the Zig Zag Railway today and sweat a bit. Or a lot. More like a lot.

We decided to replace a couple more sleepers along middle road that have become damaged. This contraption is a sleeper puller that makes this job much easier. All you need to do is pull some levers and it will pull out the old sleeper. Then line up the new one and push it home with the power of hydraulics.

The way this machine has been built is quite simple. A petrol fueled hydraulic power pack that is just connected on the the valving. This meant that during construction an off the shelf part could be used. Eliminating the complicated and fiddly design and set up of petrol motor, hydraulic pump & reservoirs and cooling for each.

Unfortunately there seems to be a problem with the fuel pump. Once we had pretty much finished the first sleeper we started having fuel starvation issues. With the motor stumbling then picking itself back up again. Eventually it died and we finished off that sleeper by hand. We were able to get it started again by getting the fuel filter filled. However that only lased a few minutes before we had to fill it again. Eventually we did get both sleepers changed and are now in place ready for baseplates & spikes.

Heading back down for lunch. He seems to be pretty keen for it!

Cheers,
Rex

Trying to get a fan

Yesterday to try and keep out of the heat I stayed inside and tried to get some work done on the CNC Mill. I have tested all of the steppers and everything looks good there. However the Pololu stepper drivers I have only have a fairly small heatsink on them. I am not exceeding the rating that is recommended with the supplied heatsink, but I am at the limit of what can be done there. So with that in mind, I would like a bit more headroom.

When LMC built this control box they quite kindly left a fan shaped cutout for me. Unfortunately the fan that was originally in there ran from the 110V mains this was set up for. So I plan to use one of the PC fans that I have sitting around here instead.
This fan is close enough to a good fit in the cutout that it will work fine. However, upon testing I found that it would not spin. The cogging effect was increased though. Then I looked at the small print. It is a brushless DC motor. I do not know much about these, but it seems they need a varying DC waveform rather than pure DC.

So where in here can I get a varying DC waveform from? One of the PWM outputs from the BeBoPr Beaglebone cape of course. The plan was to get machinekit running and then set up a user controlled variable to adjust the PWM duty cycle until I found the sweet spot. Then set it u so that whenever the machine is turned on in Machinekit then the fan would start.

That was a good plan. Except for the fact that because I haven't done anything with this for months and months. I couldn't get machinekit to run at all. Then I tried a new, clean image to make sure that there wasn't a setting causing the problem. However then I ran into a problem with my HDMI to VGA adapter. Apparently the Beaglebone Black doesn't supply enough current over the HDMI port to run a passive adapter. So I either have to hook this up to the TV in the loungeroom, buy an active adapter or I can mod the passive adapter. I actually have all the parts I need to be able to regulate the 12V down to 5V needed and wire up the regulator. So I might end up doing that.

So keep an eye out for either a fan installation, or modding a passive HDMI to VGA adapter.

Cheers,
Rex


Actually I just remembered that I have a fan in one of my servers that is run from a molex connector for the disk drives. That means it runs from 5 or 12V DC and can be made to work here. Seeing as I am not using the servers anymore I might just re-purpose it for this.

Monday, 26 December 2016

A frustrating discovery.

Today I was hoping to start using my shiny new tools that I was lucky enough to recieve at Christmas. One of the front wheels on the land rover has had a leak on the back of it, apparently from a failed swivel ball seal. The procedure from replacing one of these can be somewhat of an ordeal at the best of times so I figured I'd have a crack when I had the week off work. However I only got this far:
I thought that I could pull the axle out, then I could separate the hub from the axle and replace the seal without actually removing the hub or the brake hose. Unfortunately as I broke the seal that should have been holding in a heap of EP90 oil there wasn't any oil come out. In fact there was a little water come out. All of a sudden this job went from something that would be a pain but doable in a few days, replace a seal with a generic one from one of the shops in town and then all done. To, dismantle the entire hub assembly, degrease, clean & check for rust on every component. Get new seals & bearings where needed, clean, paint and reassemble. Then I will have to do the other side to make sure that it has not had the same issue.

My unfortunate discovery, with a little old brake fluid to start the cleaning process.

Actually come to think of it, I might pull off the front axle, leave the body on jack stands and strip it all down. Just to be sure that the diff is good as well and it hasn't had it's oil contaminated.

Anyway, watch this space. Lots to happen soon on this now.

Cheers,
Rex