Showing posts with label Burner. Show all posts

Friday, 29 July 2016

Waste oil burner. This time with videos.

Last weekend I fired up the oil burner again. This time I prepared a reasonable amount of fuel for pre-heating. I even tried to light it without accelerants. Unfortunately everything was wet and the kerosene was so close to hand. So I did cheat a little.
Here I am, with the pile of wood just starting things happening.
Maybe a little quick. But I didn't quite kill it.
Starting to burn down nicely.
Starting to get a bit excited with a little oil and air added.
I managed to turn the oil down too far without realizing it as the fire got a little too smokey. It was taking off but it didn't feel quite right so I fiddle with the oil and lo and behold. It starts to take off.
Lets see if I can make stuff hot with it.
A little hard to see here, but the bar certainly did get forging hot.
Lets see if we can make something a little more substantial properly hot.
The end of the camshaft needed a little support to keep it in the hottest zone.
While it probably would've looked much better at night it did get hot enough to move some metal around a little. I think the white coating is fine ash from the wood getting blown around by the blast from the burner and coating everything.
Just before I shut it down.
And here we are cooling down. When I came back an hour or 2 later there was still a fair bit of heat radiating out from the bricks. They were definately hotter than you would want to touch.

Here is a quick shot of me pre-heating the fire pit before anything got too exciting.
Here we are with the burner running and adjusting the air/oil mix a little.

I'm hoping to get some more shots of interesting stuff getting done this weekend so keep an eye out for those next week.

Cheers,
Rex

Wednesday, 6 July 2016

I can make stuff hot again

So in my experiments with waste oil burning I have reached a new milestone. On Friday night I managed to make something hot using waste oil and compressed air alone.

I can also still break hammers. I think I trimmed too much off when I fitted the head on last time so it has just slid over the taper the wedges put in the wood. I have a few plans on how to fix this so it doesn't happen again. I'll be bringing you along for my experimentation there as well.

It took me a little while to get the fire going this good. To start with what I was trying was dripping the oil into a stream of air from my shop-vac on blow, atomizing(?) it then carrying it through into a fire that I'd already lit to get some heat into the fireplace. Unfortunately that didn't work.
I had some charcoal in the bottom of the fire to help get a decent bed of hot ashes to be spraying the oil onto. Unfortunately with any kind of draft, even from the hairdryer. The charcoal turned into embers which were getting picked up by the wind a little and heading towards the neighbors yards. Not so good.

The next thing I tried was to just jamb the nozzle from my previous test(here) through a gap in the bricks and backfill with dirt. Unfortunately I forgot to take a photo of that as well.

This was the result:
A nice big ball of flame, with relatively few sparks as there is much less air moving. I put a spring in the fire as this is something I have been toying with a bit recently and it did get hot.
It did take a fir while so there is plenty of room to improve but a good proof of concept. It will burn when feeding into a smallish, pre-heated chamber.


Here I was deliberately running rich to get the big fat flame to come out of the fireplace and shed some light on the surrounding area so I could see what I'm doing.

It's impressive the amount of control I have over this, for a pretty crude piece of engineering.

After I turned off the burner this is what it looked like inside the fireplace. I put some bricks on top as it was spitting a little and I was hoping to stop the bricks surrounding the fireplace from cooling too quick and cracking. The glow is what's left of the fire I was using to get everything started, scraps of wood and charcoal mainly.
This is what was left a few days later. The burner is over on the left and can't quite be seen.

I took a little video of this and I will share that as soon as I have it edited together. I am going to play with this fireplace as it is for a while and see if I can get a bit more heat out of it, then I have a small gas bottle that will probably become my new forge. I will probably be lining that with some kind of fireproof material to help stop the steel from burning out.

Cheers,
Rex

Sunday, 19 June 2016

I have control over the fire now

As I mentioned in my last post about setting up a waste oil burner I have got an extra needle valve for controlling the air to the nozzle separate to the air going into the tank. You can see the new valve on the left of the tank above, at the base of the handle. It's a bit easier to control than what I was doing before:
I managed to run out of Kerosene for the blowtorch so to light the burner I was experimenting with using a little methylated spirit burner just below the intake so the flame was getting sucked into the pipe. It worked, however there is a leak in the burner so I'll have to make another one or find another way to get this working as the burner goes out almost as soon as the flame is removed from the intake.


The next thing I will probably try is to make a low pressure high volume burner. Using my reversible shop-vac as an air supply. Another thing I may try is to get a Delavan burner nozzle which have removable jets and can be configured with different spray patterns. This would give me quite a bit of flexability in terms of what I do with the burner.

Cheers,
Rex

Tuesday, 31 May 2016

I've discovered fire!!

That's right, with compressed air, waste oil and a blowtorch I have made fire at home.
Starting with this beast of a thing on the right:
And a bunch of fittings:
And some Pipe:
I managed to make an oil burner. I put an outlet in the bottom of the tank, blocked off one of the ports and put a T-piece on one of the other ports so I could let air into the tank.
I put the air in through a regulator I got from the hardware store. I'm not sure if it's because it was a cheap one, or it's designed to operate at higher pressure, or the setup was just wrong but I found that by clamping down on the plastic air hose going to the nozzle I could get the burner to run reliably. I had put a needle valve in the fuel flow so I had control of air and fuel. But I think the control of air was still too coarse. Before next weekend I will get another needle valve for the air and use that to control it, rather than a set of multi-grips:
While setting this up I did manage to tidy things up with a bit of cotton twine and parceled the fuel and air hoses together a bit to help control the tangle before reaching the mixer.
Hopefully this weekend I will get some more fittings and then will be able to get a video of this beast of a thing running. I used the blowtorch we saw here to light up the burner, but I had to keep it on hand as it was very prone to flameout which I think was because there was too much air coming through because the fuel is too viscous at the cooler winter temperatures.
Now that it is starting to cool down I have got some Metho for lighting up this burner. Unfortunately I haven't quite got the amount that I need right so starting it gets a little exciting. If anyone is interested I will do a video of me setting it on fire. Erm, lighting it...

Anyway that's all for tonight
Cheers,
Rex

Tuesday, 1 December 2015

Warm deal from the markets.

As I mentioned previously I picked up a neat little item for the markets on Sunday.

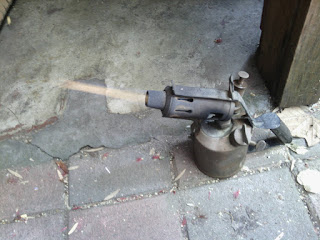
It's a little kerosene blow torch. I've been keeping an eye out for something like this as I like the idea of having tools that will work with a wider range of inputs than what we often see. Ie. a propane torch will only really run on propane without a lot of work. This will run on any liquid that has similar volatility to kero.

When I bought it my biggest concern was if the leather in the pump was going to be shot. I pulled out the pump and had a look, it was dry as a bone but there weren't any cracks and it seemed like a good fit.
As it seemed to be at least likely to work I decided to just pour some fuel straight down the pump to help moisten the leather and not have to worry about trying to get it back in the body of the pump without damaging it.

After filling it up and pumping it a little, it fired up pretty much straight away without making to much of a mess or smoking too much. I think this was largely due to the fact that the nozzle had some spider webs in it which helped catch on fire before the kerosene started to really flow out the nozzle and did a sort of pre-heat. There is a little cup for putting pre-heating spirit into, but I don't have any and it did start without any today; however it did set most of the top of the thing on fire at the same time.

This was after it had lit and was fully warmed up. You can just see the flame coming out of the end of the burner. I wanted to include this photo to show just how cleanly these can burn.
This photo had a bit less lighting, making the flame stand out more. You can fairly easily see the yellow tongue of flame, but also around that the is also blue flame. Older fuels will still give a clean burn, just not right away.

The beeswax I ordered hasn't been used yet. But keep an eye out and I'll be putting something up about that soonish.

Cheers,
Rex

Monday, 15 July 2013

Oil Burner Atomiser

Due to some offcuts of 12mm square bar from the frames of our Heisler loco becoming avaliable I'm going to make some small test runs of making some atomizers for it.

I can't find any open source CAM software for outputting to a lathe so I'm going to be writing the G-Code by hand in gedit. I'm getting the design from here which I've found to be a very good resource for info in the shay and heisler locomotives. I am making some changes to simplify construction with the avaliable tools (rounding to the nearest metric drill size).

I can post up some CAD files of the proposed design and the G-Code if anyone is interested.

Cheers,
Rex