I had to re-waterproof my rain jacket at the end of last year. (More detail on the process here and here). This style of jacket needs to have the waterproofing re-applied about every 6 months or when the jacket dries out too much again.
So it is a bit overdue for getting this re-done so I tried to get through it after work last night.
First though I had to re-melt the beeswax waterproofing. To do that I had to move all of the stuff that's on top of the Barbeque because I've been using it as a workbench.
That's better.
Last time I did this I felt the jacket was still a little too waxy after melting it in so that means I needed to add some more drying agents. Probably the best thing to add would be some more gum turpentine but I don't have any of that so I added a bit of linseed oil.
All of a sudden I looked back in the melting pot and a heap of wax had welled up from the bottom and was cooling again on top of everything. It did look a bit cooler in person.
Then things got a bit too exciting. Stirring to try and speed up the melting process and a little splashed over the side and managed to set the whole lot on fire. Not that surprising really considering everything in that mix is classified as flammable. Even the wax burns once it's got a bit of heat in it.
Now not as exciting. Much better.
The fire seemed to make the mixture somewhat blacker than before so it will be interesting to see, once it cools if the whole batch has been darkened.
Wipe on.
Melt in. Repeat for the next section of the jacket.
I only got a bit of the jacket finished before it got too late and I had to go to bed. But what I have done feels and looks much better and more waterproof again. I'm just hoping I will get this finished before I need to stay dry again.
It was a bit of a pain doing this because it was fairly cold and I was essentially outside. Next time hopefully I will be doing this somewhere it's a bit warmer so the waterproofing will melt into the jacket easier.
That's right, with compressed air, waste oil and a blowtorch I have made fire at home.
Starting with this beast of a thing on the right:
And a bunch of fittings:
And some Pipe:
I managed to make an oil burner. I put an outlet in the bottom of the tank, blocked off one of the ports and put a T-piece on one of the other ports so I could let air into the tank.
I put the air in through a regulator I got from the hardware store. I'm not sure if it's because it was a cheap one, or it's designed to operate at higher pressure, or the setup was just wrong but I found that by clamping down on the plastic air hose going to the nozzle I could get the burner to run reliably. I had put a needle valve in the fuel flow so I had control of air and fuel. But I think the control of air was still too coarse. Before next weekend I will get another needle valve for the air and use that to control it, rather than a set of multi-grips:
While setting this up I did manage to tidy things up with a bit of cotton twine and parceled the fuel and air hoses together a bit to help control the tangle before reaching the mixer.
Hopefully this weekend I will get some more fittings and then will be able to get a video of this beast of a thing running. I used the blowtorch we saw here to light up the burner, but I had to keep it on hand as it was very prone to flameout which I think was because there was too much air coming through because the fuel is too viscous at the cooler winter temperatures.
Now that it is starting to cool down I have got some Metho for lighting up this burner. Unfortunately I haven't quite got the amount that I need right so starting it gets a little exciting. If anyone is interested I will do a video of me setting it on fire. Erm, lighting it...
I broke the last handle I had on a decent hammer, so now that it's cooling down it is not as crazy to have a fire going and there is no point having a fire without red hot meal is there? I just bought a new handle from the hardware store. I'm quite happy with it. It wasn't varnished which is the biggest problem I've found with most new handles you can buy.
Hmmm, good starting point, but difficult to work metal like this.
Still some shaping to go. Lets get to it then.
I started off trying to be sensible and gave the plane a go. Unfortunately it wasn't really that useful. Because of the relatively radical shape of the handle it didn't really cut on the end of the handle. A Spokeshave or Drawknife would've been better tools.
Seeing as the plane didn't work I figured I'd give the rough old hatchet that we've had lying around for ages a go. Unfortunately it is the epitome of not sharpness and would be vastly improved with an hour or so of work. But this did remove material fairly well and though it was a bit rough in the end it worked.
I thought I should probably take a little care of what's left of the edge on this and put a piece of an old pallet on the anvil I was working on. Eventually I will get around to sharpening it properly. But until then I don't need to worry too much about the edge.
This is what the handle ended up needing to fit the head of the hammer. I didn't realise the eye was so small. If I end up making a hammer then this is something I will have to be careful of to ensure that the eye is a reasonable size so that an off the shelf handle will work.
Nearly there. Can you spot what still needs doing?
Wedges!! though perhaps not with sweet chili sauce or sour cream. But still one of the many useful things that make this much easier.
And here it is all finished.
Of course I had to test it. However there wasn't much to see past this point. Particularly after I started to try some charcoal Briquettes. They looked like they were getting hot, but there was no heat in the body of the fire and it died as painful death. Perhaps something to do with this?
Anyway, it could also be that I'm using a dodgy forge design and it's blocked up with ash and dirt. A very distinct possibility.
Now that I have a working hammer however, all that I will need to do is light a fire, get a draft and I can get to it. So look out for more forging posts over the next few months.
Those who know me will agree that I'm lazy, very lazy. If there is an easy way to do something I will do my best to find it. So when I had in mind a project that needed a smallish metal container I went looking for the easiest thing I could find.
A tin can will serve nicely for what I have coming up and many other projects in the future. But how to clean it without taking too much effort? Here's what I came up with:
If you look closely you can see I put it in a little fire I lit to burn off some of the tree trimmings from our yard. I got impatient so I pulled out the can rather than just letting the fire burn out. This is what I had left:
It is a little blackened and charred, but a light coating of carbon may actually help with what I have in mind. But if I needed to I could probably clean up the can with a wire brush or some sand paper. But I don't need it clean and I am lazy so it will stay dirty.
So there you have it. If you need a tin can for a project and don't want to spend too much time cleaning it all you need is a fire and the work will be basically done for you.
As I mentioned previously I picked up a neat little item for the markets on Sunday.
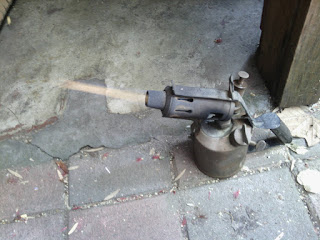
It's a little kerosene blow torch. I've been keeping an eye out for something like this as I like the idea of having tools that will work with a wider range of inputs than what we often see. Ie. a propane torch will only really run on propane without a lot of work. This will run on any liquid that has similar volatility to kero.
When I bought it my biggest concern was if the leather in the pump was going to be shot. I pulled out the pump and had a look, it was dry as a bone but there weren't any cracks and it seemed like a good fit.
As it seemed to be at least likely to work I decided to just pour some fuel straight down the pump to help moisten the leather and not have to worry about trying to get it back in the body of the pump without damaging it.
After filling it up and pumping it a little, it fired up pretty much straight away without making to much of a mess or smoking too much. I think this was largely due to the fact that the nozzle had some spider webs in it which helped catch on fire before the kerosene started to really flow out the nozzle and did a sort of pre-heat. There is a little cup for putting pre-heating spirit into, but I don't have any and it did start without any today; however it did set most of the top of the thing on fire at the same time.
This was after it had lit and was fully warmed up. You can just see the flame coming out of the end of the burner. I wanted to include this photo to show just how cleanly these can burn.
This photo had a bit less lighting, making the flame stand out more. You can fairly easily see the yellow tongue of flame, but also around that the is also blue flame. Older fuels will still give a clean burn, just not right away.
The beeswax I ordered hasn't been used yet. But keep an eye out and I'll be putting something up about that soonish.