Showing posts with label Jeep. Show all posts

Thursday, 1 October 2015

It works

No more leaks.
A huge thank you to my brother today, without whom the Jeep would still be parked in Mum and Dad's driveway with a line missing. As I have been a bit unwell the last few days

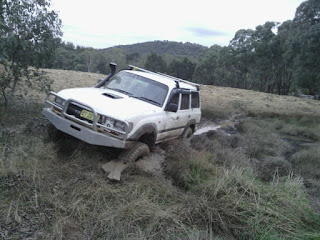
As you can see from the photo it is in a new spot. Actually nearly the same spot we first saw it in on this blog. Which is rather fitting as this is likely going to be the last we see of it as I am now looking for a new owner so I can focus on other projects that will take me in the direction I am hoping to be travelling. Particularly this dinghy that is still waiting for a trailer to be built. Which will probably be happening sooner rather than later as it is warming up nicely, providing good motivation for getting it mobile and sailing.

Cheers for now,
Rex

Monday, 28 September 2015

It's getting better

So you may notice that the Jeep has moved; and there is not a huge stream of ATF leading to it. Unfortunately as you can see there is still a small leak and there were a few little spots on the ground in work's carpark. But I think that s getting caused by dodgy pipe dope that I used to seal the fittings rather than the plumbers tape I used last time which didn't seem to leak.

Eventually I'll be happy with the state of the car... Probably not before I find a new owner though. A little more work and she'll look like new I think.

Cheers,
Rex

Thursday, 24 September 2015

Jeep had an oopsie

Apparently there's a leak.
So I took the jeep out the other day and managed to break it. Badly. I think I know the cause and I'll do a writeup on fixing it. But before I do that I needed to turn it around. In that time you can see the ATF that came out while I ran it to turn it around.

Keep an eye out for the fix and the overall solution to make sure this doesn't happen again.

Cheers,
Rex

Wednesday, 9 September 2015

The death of a wreck

So we finally got the last of the parts I wanted off the falcon and this weekend the scrapper is picking it up. The list is surprisingly long especially when you consider how quickly it all came off. Here it is, along with what I plan to do with each item:
 - Airbag - Set off in the paddock with a plough disk or somthing on it
 - Intake manifold - Scrap?Sell? Whatever. I needed it out of the way
 - Injectors - I'm probably going to put these on the Jeep to see if the more modern injectors give me better economy.
 - Throttlebody - Possibly, maybe, unlike but it may end up on the Jeep. I think it's a bit bigger than stock so less restriction at WOT.
 - Fuel Tank - This is going in the Rodeo which will mean that I can drive nearly 1000km without having to refil.
 - Exhaust pipe - I'm goiung to use some of the bends from the pipe to help me make up the new exhaust for the Rodeo
 - Radiator & Fans - With any luck the fans will fit on the Jeep so I can get rid of the mechanical fan.
 - Air con compresser - This is an exciting one, This will be going in the Jeep for use as an endless air setup.
 - Rocker cover - I'll probably clean this up and paint it then sell it
 - Can Shaft - Either sell this or hang it up somewhere as decoration.
 - Power Steering Pump - This will become an oil pump in some future project.
 - Towbar - Sell, no good without the car it goes on.

I think that's pretty much all that came off the Falcon. If anyone is interested it's a Ford Falcon AU II ute. I will update this page with links when I use any of the above in my projects.

Cheers,
Rex

Wednesday, 15 July 2015

Snow is cold

So with the recent cold weather it has been snowing at my mate's place up the highway a little. So seeing as snow is a bit of a novelty for us we decided to the the jeep for a drive and play around in it a little. Here are some photos from that:

Lets see what I can stay on while being towed. It's a shame we didn't get a picture of me on the snowboard. That actually slid.

It was a little chilly, probably should have put on another jumper.

Now the jeep has a hood ornament. They actually nearly lasted the whole way home.

There's a lot of heat coming up from that bonnet. I might see if I can put some vents in to help it keep cool.

Nice and warm at home before we left. Sort of.

Cold and wet, not much fun.

Cold and snowy, more fun than cold and wet.

Not many people were overtaking on the highway.


We had a good afternoon and proved that the Jeep can handle a little snow at least. If it stays this cold there may be some pictures coming up of it in muddy snow.

Cheers,
Rex

Tuesday, 9 June 2015

Stuck! Then not so

So On the way home from work on Friday I got a call from a friend, who said that he had got his car a little stuck. Upon getting out to the property where he lives this is what I found:


Now I hadn't expected him to be only a little stuck for him to have to call me. But I hadn't expected him to be stuck because he tried to get through a dam. Moral to the story, you'll get stuck if you try to drive through a dam. Also interestingly enough he probably could have gotten out if he could lock his differentials so that both tires would spin at the same speed.

Thankfully the Jeep was up to the task, however not without low range. It wouldn't do anything in high range 4wd. When I put it in low range I managed to sucessfully dig up 4 little homes where the wheels were:

Not the best photo, but the light was just about gone by then. So after moving a few feet to the right and using a snatching technique, rather than a standing start. We managed to break the chain that was holding the strap onto the Toyota; then finally it was free. And this was the hole it left behind:

Anyhow, all ended well and we had a lemonade at the house then headed home. So it seems I can pull a car out of the mud with the Jeep.

I got a bit of work done on a few projects over the long weekend so over the next few days I'll be putting stuff up on those so keep an eye out.

Cheers,
Rex

Tuesday, 2 June 2015

Cold weather

So just a short update here. This was the roof of the Jeep the other day at 9:00AM. Admittedly it was parked in the shade, but still.

And yes, this does have something to do with my desire to build a boat and liveaboard it. It's a lot easier to chase the weather when your entire house can move.

Sunday, 31 May 2015

Cars, Grounds and Radios

So I managed to get a little done over the weekend. The grounding for my HF radio has always been a little unsatisfactory to me. So I set out to improve that a little. Currently I only have a stake half buried into the ground below my vertical antenna.

 To improve this I have added 4 radials of equal length at as long as possible within my yard. I know that 4 radials is not ideal, however I am expecting a significant improvement over the current system. One of the biggest concerns I have is with my connection point.

This is where the joint between the radials and the wire that will connect to the bracket for the antenna. Unfortunately at this point I tried to heat up my soldering iron and it just won't heat up. So I'm going to have to see if I can borrow a soldering iron from somebody.

So seeing as I couldn't do anymore out here I decided to put my VHF Ham set into the Jeep. This was one of those projects that I got a little excited about so I don't have any photos of that. But I still have to mount an antenna so I'll get some pictures then.

After I finished setting up the radio I decided to chase some wires that are attached to what seem to be microphones in the cab. Chasing those lead me to this little box:
Chasing the wires from the other end of that box lead through the firewall and eventually to this box under the bonnet on the passenger's side:
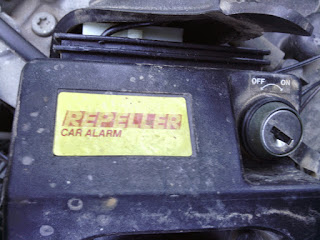
Upon unplugging this and removing it from the car I was quite surprised by what I found on the opposite side of that box.

So this was not really expected and thankfully off and not activated, otherwise we could very well have had a very exciting time getting to this stage. I have it off and on my desk at the moment so I'll see if there is anything useful or interesting and I might put it back in. Otherwise I will see if I can remove all of the wiring that it has, just to minimize the spaghetti mess inside the car.

Thursday, 2 April 2015

On with it's head, then off again. And a return to normal viewing

So I haven't posted for a while, mostly because I have started to use a camera and have since lost all of the photos.

So the long and the short of it is, that I got the head back on, the engine running and everything good; even booked in for rego. Then the welch plug in the back of the head that I hadn't seen while it was off began to leak. Badly. Eventually I managed to not get it out with everything in place so I ended up taking everything off again including the head. With the head off it took all of around 10 minutes to remove and then install a new welch plug. With everything back on I got it started, no leaks. Phew.

From there I got it registered, drove it for a few weeks, took it to Sydney. Took the old oil that I'd put into it out and replaced it with fresh stuff. and gave it a good clean inside, still needs one outside though.

After Driving it for a while I noticed a strange noise from the front end while in 4wd mode. Solution 1, change the oil in the front diff and check what it loos like inside. No dice. Next, start researching online. One option seemed to be that it was "Angry Sparrows" or a squeak from something potentially worn in the front drive shaft. So off with that. It turned out to be a piece of cake, just 8 bolts to remove. Upon inspection I discovered the the apparent reason for the noise was a lack of grease in the ball in the middle of the double carden (CV) joint near the transfer case.

After pulling the double carden apart and damaging(?) one of the universal joints grease was worked into the ball because a replacement kit was around $100 which is somewhat more than I was willing to spend. Everything got re-assembled and then a short drive was taken. Silence, no more angry birds for me.

With that fixed I started to think about the trip I am leaving on tonight and the fact I will be towing a trailer ~1000km each way in an automatic of less than ideal status. I looked into a transmission oil cooler and discovered that there was already one installed. I also wanted to be able to measure the oil temperature so I installed a SAAS oil temp. gauge as a transmission temperature gauge. The install was very straight forward and didn't take too long except for the cutting of the hard line. That had to be done by hand with a hacksaw blade as we had nothing else that would fit in the small space.

So from here I have a 3 new projects all of which are exciting and I am looking forward to all of them. One involves a road trip this weekend, one involves rainwater and the last involves my wreck, EFI, turbos and someone else's car. All will be exciting and lots of learning will be done in all 3 new projects.

Until next time, Cheers.
Rex

Thursday, 22 January 2015

Off with it's head!

Last night I got the head removed from the XJ Jeep Cherokee I've been working on. This is what it looked like before I started:

I decided to leave both manifolds on and just deal with the extra weight. It was heavy but it was still easier to do that than remove the bolts that are hidden under the intake manifold.

It's not very obvious but on this bolt there is a very thick black gummy something all over the threads. Not sure what it is but hopefully I'll be able to clean it off before I put this all back together.


Here's a shot showing my highly sophisticated lifting mechanism with it halfway out:
One of the bolts on the top for the manifolds is pretty well in the middle weight wise front to back so with the chain over that. With the chain secured I put a foot above the firewall and another one above the radiator; and lifted. Thank goodness for joining a gym is all I can say. I was able to lift it and with my able helper guiding the head I could move it between 1' and 6" at a time. Everntually I got it off the car and a bit lower, this is what it looked like then:

From there it was fairly easy to get my hands under it and carry it over to the bench; where it got turned over for removal of the gasket and preliminary inspection:

The gasket is still on here, as you can see near cylinder 1 it seems to have blown out completely and around cylinder 6 it's deformed and blown into the cooling jacket. Not good, you'll see the results of that a little further on.

It looks like when I had gotten it running cylinders 1 & 6 weren't working at all and as such don't have any sooty buildup in them. The other 4 cylinders do which makes me think that it possibly wasn't running properly, but that may have just been because it was cold and only had 4 cylinders going.

One more interesting point here is the exhaust manifold. From the build quality I hope nobody was paid to do it. The welds are not very fine and there were long bits of welding wire were sticking out in a few spots.

This is what the block looked like once I got back to it:


Not a very pretty sight. Just to see what would happen I tried turning it over with a socket. This went well and pretty easily. This allowed me to get that water out of number 6 and get a good spray of WD-40 over everything to help reduce any corrosion that may yet happen.This is what it looked like then:

Most of the water in Number 6 ran out over the back of the block. So it will only need a little bit of mopping to get the rest out.

That's pretty much all there is, from not it will just be cleaning up parts, checking tolerances and buying replacements for a little while. So if I don't post for a little while don't worry, just getting everything prepared for the next stage.

Tuesday, 20 January 2015

Soon, Soon

Not much to report tonight, pretty much got everything sorted for removing the head tomorrow. Got the exhaust disconnected from the extractors from under here:

And above here:
That was probably the nicest pair of nuts to undo today, even though there was only enough space for the ratchet to move 2 or 3 clicks at a time.

Got the bolts holding down the head off like this:

I only got to this state after removing a 11/16" nut holding down an earth strap. Unfortunately I didn't realize there even was a 11/16" spanner in the house, let alone that was the size for a good 20 minutes.

Also the manual says that the bolts holding the head on are 1/2" or 13mm. I tried them with a 13mm spanner and started to strip the 12 point head so I decided to buy a slightly smaller 1/2" deep socket. The fun thing about the 1/2" deep sockets sold at Bunnings is the hole in the middle is tapered, with the smaller end towards the bolt. This meant that the brand new tool I'd just driven across town and bought was actually not going to work. So after messing with sandpaper and getting nowhere a round file was found that was used to enlarge the narrow end of the taper just enough to be able to be pushed over the studs. However that is still not the end of the story. Because after loosening some of the bolts the socket would get stuck on the stud. The solution involved a hammer, a 1/4" drive socket extension and a sharp corner in the engine bay. By putting the extension down the middle of the socket so it was resting on the end of the stud, putting a sharp corner in between the socket and the stud I was able to tap them out. Thankfully.

By this time tomorrow I should have the engine in halves and some very interesting photos to show just how bad this engine has become.

Bad, Bad Oil

So I didn't end up getting much (Anything) done on the Jeep last week and the weekend was busy with sailing on the James Craig and then doing maintenance at the Zig Zag Railway. However yesterday I feel I made some good progress and got the rockers and pushrods out. I also got the bucket with the old sump oil out from under the car. This is what it looked like after I pulled it out:

You can see some little bits of green from the coolant that has been getting into the oil.
This is what it looked like aft I stirred it up a little. The same as when it came out originally.


I also got the rocker cover and rockers/pushrods out.

It was pretty awkward to get to so this was how I was getting to pretty much everything:
There was also a bolt hidden right at the back that I had no hope of getting a socket onto it so back to doing it the old way with a 5/32" ring spanner. Once I managed to find the damn thing and get it undone this was the sight I was met with:


Yes that is more nasty oil on the rockers and even little drops of water on the bridges between the intake and exhaust. That's how much water was in the oil, not good. We'll have to see what else is going to be going on and broken in the next few days getting further down into the engine. So this is what all that looked like after being removed from the engine:


There's a lot of that nasty oil that will need to be cleaned up and hopefully there won't be any surprises while cleaning it all up that can't be at lease ignored until we squeeze the last few thousand km's out of this engine before it is going to need more work than just a gasket.

Today hopefully I'll get the exhaust undone from the headers which should be the last thing left to do before finally removing the head completely.

Thursday, 15 January 2015

The saga begins

Last night I got started on my mate's Jeep that I was talking about in one of my previous posts. It had an unfortunate accident with a lake (about halfway up the engine bay) last month and has been sitting out the front in the way since then. It was agreed that I can put it near the back veranda until the start of next month so I'll be trying to get this all finished by then.

After messing about for a few hours we managed to get it running, very, very roughly (3 or 4 cyl out of 6) and clouds of coolant out the back. After getting it going to this point we decided to top up the coolant with plain water then drive it around the back so we can work on it a bit easier. While filling I thought it was taking more water that I expected so I had a little look and water was pouring out around the head gasket. So it looks like I'll be stripping the head off at the least.

This is where it was as I started pulling everything out. If you look closely, on the right hand side you can see the throttle body where the plenum and the air hose from the filter were held on with silastic and fell off while we were getting it started earlier. Most of the oily stains that can be seen are from us spraying WD-40 around to make sure no water was in the electrics.


Here is another look into the engine bay. Off to the right you can see the air filter. It has definitely gotten wet and there are small holes in the bottom of the air box that seem to have let water in which has probably contributed to the gasket failing.


At the moment I have removed the Power Steering pump, fan and alternator. I have also drained the oil and coolant. Unfortunately I didn't get a very good picture as the light was starting to fail, however I will get one this afternoon.

This afternoon is looking like removing the heater hoses, injector electrics and possibly the fuel rail.

If anyone wants more detail on a particular area let me know and I will do up a post on that.