That is now fixed. Below is a few of the steps that I had to go through to get this finished. Unfortunately I didn't get all of the steps as this because one of those projects that just needs to get done and I forgot to take any photos.
This was the most interesting part of the whole process really. What I should've done is bought an appropriately sized hole saw when I got all of the other parts from the hardware store. I forgot so I had to make do.
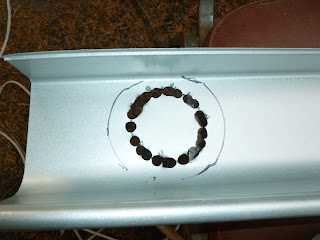
The fist thing I did was to trace around the outside and the inside of the down pipe insert. This let me know how far I had to cut out the hole in the middle and gave me a distance that I could go until it wouldn't seal. You can see a little scratch from where I tried to drill through with my biggest drill without a pilot hole. That didn't work very well so I went around the outside with a smaller drill then opened out the holes to the size of my largest drill.
Who can see the mistake yet?
With all of the holes opened out there was only a little metal holding the centre of the hole in place. To punch through those I put a house brick underneath and used a chisel to punch through the holes in the brick. What I should've used is a cold chisel. However I only had an old half busted wood chisel that needs a fair bit of time on the grinder before it will cut anything. Anyway because it was no good I just used it to punch out the little tangs that are left.
My mistake should be very apparent now. And it wasn't long after I took this photo that I realised it too. I chain drilled on the inside line. This meant that the material left by the round holes encroaches on the space the insert takes up. The right tool to fix this would be a half round file. I don't have any files in good enough condition for this much work so I had to find an alternative. What I ended up doing was using the brick as an anvil and with the ball pein on my hammer I rounded the edge of the hole so it opened up enough for the insert to be forced through. Never though I'd be using blacksmith techniques to put up a gutter.
Of course this took a bit of time which could have been avoided if I'd drilled the holes a little furthur out rather than right on the line. However I did get a good bit of practice doing this and next time I have to peen something over like this I'll probably be a bit better.
This was the end cap before I riveted it in and added the silicone.The edge of the gutter pulled in with the rivets and the silicone filled the rest of the gaps.
Here is my ultra safe and accurate measuring system for where to put the first bracket in. I held the gutter with 1 hand, then pushed the blade into the board until it would hold then pulled the blade out of the knife. Then I sat the bracket on top of the blade and put the nails in enough to hold it, then removed the nails.
Next steps here is to get a thing to catch the leaves as they come out of the gutter, then connect this up to some kind of tank so I can water the grass here without worrying about how much water I'm using.
If you want more details, have any suggestions or questions please get in tough or leave a comment below.
Cheers,
Rex


No comments:
Post a Comment