Tuesday, 1 December 2015

Warm deal from the markets.

As I mentioned previously I picked up a neat little item for the markets on Sunday.

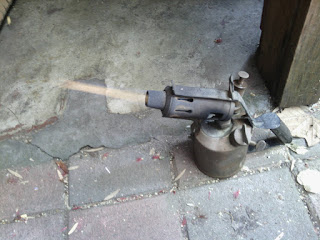
It's a little kerosene blow torch. I've been keeping an eye out for something like this as I like the idea of having tools that will work with a wider range of inputs than what we often see. Ie. a propane torch will only really run on propane without a lot of work. This will run on any liquid that has similar volatility to kero.

When I bought it my biggest concern was if the leather in the pump was going to be shot. I pulled out the pump and had a look, it was dry as a bone but there weren't any cracks and it seemed like a good fit.
As it seemed to be at least likely to work I decided to just pour some fuel straight down the pump to help moisten the leather and not have to worry about trying to get it back in the body of the pump without damaging it.

After filling it up and pumping it a little, it fired up pretty much straight away without making to much of a mess or smoking too much. I think this was largely due to the fact that the nozzle had some spider webs in it which helped catch on fire before the kerosene started to really flow out the nozzle and did a sort of pre-heat. There is a little cup for putting pre-heating spirit into, but I don't have any and it did start without any today; however it did set most of the top of the thing on fire at the same time.

This was after it had lit and was fully warmed up. You can just see the flame coming out of the end of the burner. I wanted to include this photo to show just how cleanly these can burn.
This photo had a bit less lighting, making the flame stand out more. You can fairly easily see the yellow tongue of flame, but also around that the is also blue flame. Older fuels will still give a clean burn, just not right away.

The beeswax I ordered hasn't been used yet. But keep an eye out and I'll be putting something up about that soonish.

Cheers,
Rex

Sunday, 29 November 2015

The Mill moves again

On the weekend I had the opportunity to play with the CNC mill again.
We last left it running, with the power supply integrated into the case. The old computer power supply had enough juice to run the beaglebone, but unfortunately not enough grunt to energize the stepper motors. As soon as I tried to power them up some kind of overload protection would shut the whole thing down.

To help pinpoint the exact problem here I connected my benchtop powersupply in parallel with the computer supply over the stepper driver input. This worked and I could switch machine power on and off without issue. To see if the problem was just an initial surge overloading the PSU I unplugged the benchtop supply to see if everything would still run. It did; but the PSU started to make a funny sound and I'm sure I could smell something wrong. I plugged the benchtop supply back in and the noise went away immediately, with the smell disappearing shortly after.

So it looks like I don't have a big enough power supply. The solution? I've ordered a 240V to 12V 20A swichmode supply from eBay. At the price I decided to get the 20A model as it might be a little marginal at the rated power. By getting well over I should have plenty in reserve, particularly if I want to run the spindle off it as well.

Hopefully this will arrive by the end of the week and I'll be able to install it either next weekend, or the weekend after.

Busy times at the moment, I've got something else on order from eBay that should arrive early this week. That will be an interesting little project. And I picked up something interesting from the market today which I'll do a little post on as well. So keep an eye out for those coming up.

Cheers,
Rex

Saturday, 28 November 2015

Network Sharing - Samba, Linux and Macs

Just a quick one today. I've been having issues with my samba server here at home recently and I finally had to fix it today.

Problem:What was happening was my computers running Linux would be able to connect to the smb shares on my server and I have put my movie collection onto it that way. However my girlfriend's Mac could get onto the shares but could only paste small files. Nowhere near big enough for a movie.

What was happening is samba was sharing /media which has /media/part{1,2} in it which are both mounts to large hard drives that the movies are on. I have also set up the root partition to be very small and it has relatively little space left; which is fine because almost everything else is on other partitions.

When you tried to copy across a movie on the Mac it would say there was no space left on the device and it can't copy the files. When I turned on the status bar on finder I saw that no matter what folder I was in the space it was reporting free was small, about what df -h said was free on the server's root.

The solution? Share /media/part1 & /media/part2 separately so that the free space is reported correctly.

Why:It seems that samba only shares the free space for the root of the share. Unfortunately in this situation because there were partitions mounted within the share the free space was wrong. This wasn't an issue with my linux computers because they seem to just copy until an error is given, rather then testing for free space first. The problem with the Mac system is that because it seems to be testing to make sure it can copy first and it was seeing the incorrect size it just gave up at the beginning.

Sorry for the wordy post today. Hopefully this will help someone. Probably even me if I remember to look this up here.

Cheers,
Rex

Sunday, 22 November 2015

It doesn't matter what you know

It only matters what you do. With this project I was reminded once more of the difference between being around and helping someone do something; and actually doing it yourself. Although just because you don't know exactly how to do something including all the little trick, that doesn't that you can't do it or shouldn't have a go at it.

I recently installed our clothes line properly. Before the socket for it was just put in the dirt and packed a little. This meant that there wasn't much holding it straight up. To fix this at the time we just put some rocks and sticks against the base which kinda, sorta helped. It still lent over if you didn't load it evenly and didn't spin very well.

The solution? Use that dodgy old bag of rapid set concrete that's half open in the back shed and dig a hole that's actually deep enough. Believe it or not, it worked fine. Even in the absence of PPE, qualified people or even properly stored materials. It only matters what you decide to do.

The first thing I did was to dig a hole and actually check that it was going to be deep enough. I checked it a number of times just to be sure.
After I'd dug the hole to the required depth I looked at the bag of cement, back at the hole then back at the cement and decided it probably wouldn't all fit in that sized hole. So to ensure no wastage and also to help stabilise the block of cement in the ground. I "belled" out the bottom of the hole a little so that if you were to look at the cross section of the hole the bottom has an outward flare like a bell, rather than straight sides.

After I was happy with the hole I put some water in there, more than I needed planning to let it soak into the walls of the hole so it doesn't dry out while the cement sets. Unfortunately because it's been raining recently and the ground is nice and moist it didn't soak in very well so I probably had more water than I needed for the amount of cement. I think this is what cased some of the concerns I had later.

With the water not soaked into the walls I added the cement to the hole and started to mix it through with a shovel. This was a mistake. I should've put the socket in before I put the cement in which would've saved a bit of futzing around trying to get it deep enough in the cement. Also, with hindsight it may have been easier to just mix it up in a bucket with the correct amount of water, put the socket in, then pour the cement around it.


With the socket worked deep enough that it wouldn't be sticking up out of the ground I put the rest of the clothesline into the socket so that I could get it vertical. I don't have a spirit level so I just eyeballed it from a few directions. Then to make sure it stayed there while the cement set I put a few of the blocks that were holding it back around the base.

At this I left it overnight. Then when I came back the next afternoon to have a look at it I started to get a little concerned. The concrete hadn't set yet. Apparently this stuff takes more than the 15min it says on the packet. This could've been because it was old or just as likely because there was too much water and it was taking too long to dry out. So after that discovery I left it until the next day.

After the second day and it was firm, but not set I figured it probably wont set properly; but it will still hod as firm or firmer than rammed dirt. So because I mis-judged how big the hole was I filled it the rest of the way with dirt and rammed it down. I don't have any proper tools for ramming dirt so I just used a brick I had lying around from building the forge. This packed it in plenty nicely enough for my taste and with the dirt the clothesline became much more stable.

So now it's completed and I've even got a load on there at the moment that is only on one side so it's about as unbalanced as it will get and it hasn't swung to a low point or lent over. Looks like my eye is calibrated fairly well. 

So remember, just because you've never done something or even been shown how to. It doesn't mean you can't. Just remember what you need to finished product to be and be prepared to change the plan to get there if things don't happen how you'd expect.

Cheers,
Rex

P.s. Sorry about the bad photos. I had a shocker while taking those.

Thursday, 12 November 2015

Night and Day

Christmas has come early for some of us it seems.
Last weekend we visited my girlfriend's parents to have our Christmas with them as we are going to be away and with all of us being busy we won't get to see each other again until next year. I was very lucky and got a very nice gift from them this year.

Monday, 9 November 2015

Mill Woes

Just a quick update on how the mill is going as that's the only thing that's actually had anything done on it recently. I finally got the software issues sorted and worked out a display, then when I pressed the go button to power on the motors they hissed like they should for a fraction of a second. Then.. all of the power died to the board.

A second test confirmed that this is consistent behavior unfortunately. I think what is happening is that the turn on current draw of the steppers is too high for the computer PSU and it trips the overload protection. To test this what I'm going to do is connect my bench power supply in parallel with the computer supply and then after starting the motors wind down the current. That should tell me if the computer PSU will handle the base load current.

If it will then I will probably put some kind of large capacitor across the 12V rail and GND to help minimize the surge. I may do a quick writeup on the display arrangement I finally got working, particularly if there is some interest there.

I'll report back how I go with this.

Cheers,
Rex

Friday, 23 October 2015

Brain Bender

All week I've been trying to work out what this is supposed to do all week. It came from the base of the my vertical HF Antenna. It's some kind of inductor that has one end connected to the shield and the other end connected to the actual antenna. The centre of the coax is connected to the same point on the antenna through the middle of the inductor. To see me dis-assemble the antenna or if you have any suggestions keep reading past the break.