Showing posts with label Experimentation. Show all posts

Friday, 29 July 2016

Waste oil burner. This time with videos.

Last weekend I fired up the oil burner again. This time I prepared a reasonable amount of fuel for pre-heating. I even tried to light it without accelerants. Unfortunately everything was wet and the kerosene was so close to hand. So I did cheat a little.
Here I am, with the pile of wood just starting things happening.
Maybe a little quick. But I didn't quite kill it.
Starting to burn down nicely.
Starting to get a bit excited with a little oil and air added.
I managed to turn the oil down too far without realizing it as the fire got a little too smokey. It was taking off but it didn't feel quite right so I fiddle with the oil and lo and behold. It starts to take off.
Lets see if I can make stuff hot with it.
A little hard to see here, but the bar certainly did get forging hot.
Lets see if we can make something a little more substantial properly hot.
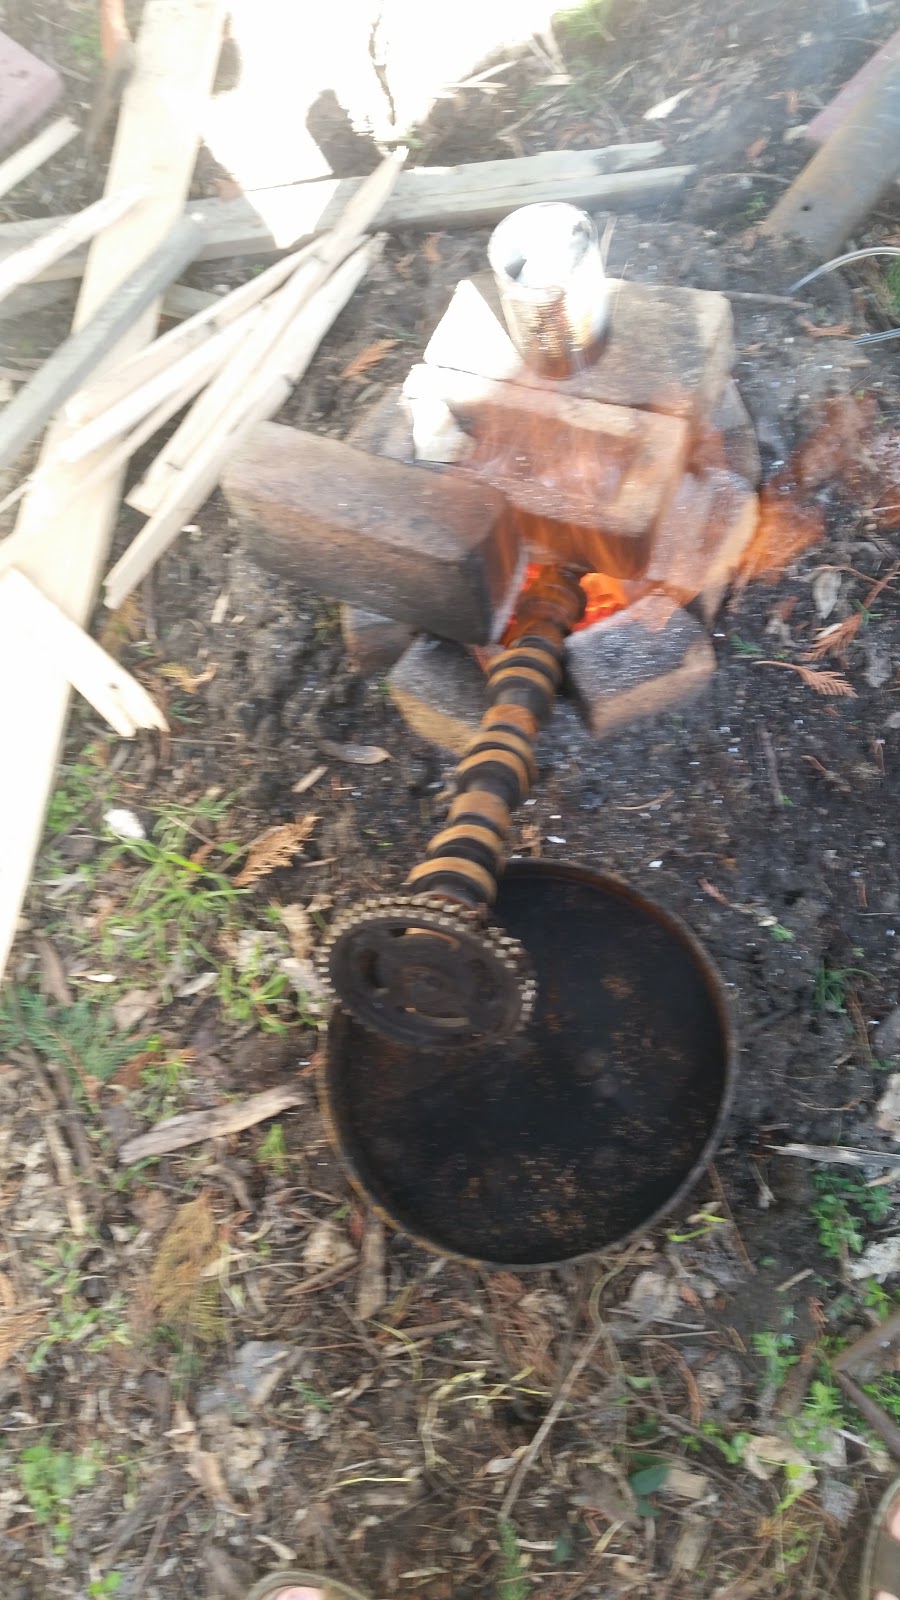
The end of the camshaft needed a little support to keep it in the hottest zone.
While it probably would've looked much better at night it did get hot enough to move some metal around a little. I think the white coating is fine ash from the wood getting blown around by the blast from the burner and coating everything.
Just before I shut it down.
And here we are cooling down. When I came back an hour or 2 later there was still a fair bit of heat radiating out from the bricks. They were definately hotter than you would want to touch.

Here is a quick shot of me pre-heating the fire pit before anything got too exciting.
Here we are with the burner running and adjusting the air/oil mix a little.

I'm hoping to get some more shots of interesting stuff getting done this weekend so keep an eye out for those next week.

Cheers,
Rex

Tuesday, 12 July 2016

Sometimes it doesn't work out

Over the weekend I tried to save some money. The car we recently bought for my lovely girlfriend needed new tires. We knew that when we bought it though so no shocks there. What I did realize though is that I have a car with tires that still have a little tread on them on a car in a paddock that doesn't need tires that are legal on the road so I thought I'd try and put those wheels on the Mazda.
This is one of the stock wheels on the Mazda, They are a 165/70R13. So they are 165mm wide at the tread and have sidewalls that are 70% of that width. The tires on the Pulsar are a 195/50R15 so 195mm wide with a sidewall 50% of that width. That means that they are lower profile and are less likely to roll over themselves during a corner; but we aren't going to be doing that sort of cornering in this car.

Being that they are a bit wider I wasn't sure if they would fit. But in the name of not wasting a set of tires with a decent bit of tread left on them I decided to give it a go anyway.

Here they are in situ. Let's do this the easy way.
A rattle gun. With proper impact bits even. I learned my lesson after wrecking a 1/2" drive to 1/4" drive adapter with this thing. Get the proper impact bits. And so far I haven't wanted to use this driver on a bolt other than the sizes in this set so for most cases a basic set like this is plenty ample.

I did however make the mistake of undoing all of the wheels in one go. Then trying to take them off one at a time. If I was doing this on a hoist that wouldn't be a problem. But if the car is sitting on it's wheels then as you jack it it will move a surprising amount and you want all of the other wheels to be secure as it's shifting to stop it falling over.

This was the only jack I had with me. It's just the one that came with my Rodeo ute and was doing fine. Until it wasn't. All of a sudden it just wouldn't move either way. I'm not sure what happened but it worked fine the next day so it might've just gotten cold, or just needed a bit of rattling around in the toolbox on the back of the ute.
Luckily there have been a couple of paddock bashers through this paddock and we have usually taken the jacks out. Either because we needed to use them, or we wanted one less loose thing in the car with us. I managed to find this one down near where some of these cars have been kept in the past. It even had a driver on it so I could put a socket on there and jack up the car with the rattle gun. Very easy way of doing it.

So this is why they say to do this on level ground? That black dot is the last tire. It didn't fall over when I dropped it after taking it off. Then I couldn't kick it over to stop it so I just let it go. It finished not far from this picture so I just picked it up on my way out.

Here we are. That's a pretty tight fit. Overall these wheels have a slightly larger diameter. But within what is allowed by law so it's only a case of will they hit anything?
Moment of truth here...
And a no go. Unfortunately we don't just drive in a straight line so these wheels didn't fit.

We had a new set put on today for about $400. Not going to take food off the table, but it would've been nice to be able to put that off for a few weeks even.

But that's something to remember. As much as I do eventually get just about everything working how I want it. Sometimes it just isn't going to happen and the time and effort you have invested could probably have been better served elsewhere. But this was only a bit of fun and the results either way was very much more about if I could do it, rather than it being critical.

Cheers,
Rex

Thursday, 7 July 2016

A Little more practice needed

So tonight I decided to have a little play with the Lathe. I probably should've gone to bed early for work tomorrow. but it was calling me.
You may remember that I am setting up a fixture on my mill to experiment with parts drawn in Fusion 360 then exported through to it. Unfortunately as you can see in the above picture the hold down bolts I have are a little too long. To fix this I could cut them down with the hacksaw. But I thought it would be a lot cooler and good experience to use the lathe.
So I set everything up as near as I could figure to correct.
I put a little oil on the part. I was planning to add a drop halfway through, but the spindle doesn't run with the face shield up so I had to put a drop on then just let it go. Probably not too big of a concern with this part at it's fairly small and although it will produce some heat it shouldn't get too bad.
The result of the first pass. The spindle started to load up a little then the tool seemed to jump over the little nipple that was left without actually cutting through it. So perhaps the tool is too high? Simple solution, lower it then.
Hmmm. Possibly too low. This picture looks much worse than it did in real life.
Here we go. I did add another drop of oil, but it had pretty much been thrown off by the time the tool came in, I probably won't worry in the future.
It worked. Kinda. It's a bit difficult to see in the pictures. But the surface finish on the part in the chuck isn't great and while it did cut through it wasn't particularly happy about it.

I thought it must be too low now so I moved everything around again and had another crack at this. Just for practice now.
Unfortunately this attempt was an unmitigated disaster. The tool got caught in the threads and was deflected off to the side. Then it started to cut. Thankfully I stopped the machine before anything snapped.
The Solution? Turned out not but it was a fun thing to try. I set up another tool opposite the parting tool. This is more or less how the machine was when I received it. I wish now that I'd played around more as it was. But hindsight is 20/20 and I knew even less then than I do now. However I was able to turn this to a fairly good surface finish quite easily.
The feed was set at about 10mm/min, the depth of cut was about what looked pretty good and the spindle was set at 1/4 of the way between 200 and 2000 on the dial for it. Not sure how accurate that is though.

So now that we have a nice flat surface that isn't going to deflect the tool lets try again.
This was the result. The tool just rubbed and pushed the workpiece around. It actually crushed some of the threads in the chuck so the steppers at least have a bit of go to them even if the spindle is a bit weak.

At this point I decided to call it a night and had a quick look at the turning insert I was using.
Thankfully no visible damage as I expected. However it is always good to double check.

I will probably go back to playing with the wax and delrin(?) blanks I have for a little while, at least until I get a better feel for how each of the tools work and getting them set properly. The good news there is that means I will probably get to the mill sooner again. I will rig up a fan that actually works to send some air over the stepper drivers as they do get quite hot although I think they are still just within spec for passive cooling. Then once that's done, I have worked out a method for driving the spindle so it will be full speed ahead for making some chips over there too.

Cheers,
Rex